
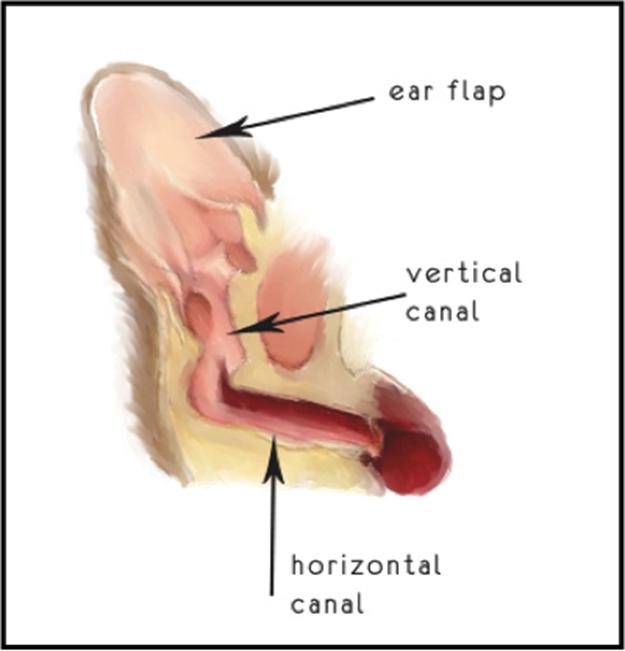
Do you regularly wonder how to clean dog’s ears safely at home? Have you ever taken a close look at your dog’s ear canal? If you examine it carefully, you’ll notice that, unlike humans, dogs have a unique L-shaped ear canal. This makes it easy for earwax, dust, and moisture to accumulate inside the ear canal. If not properly cleaned over time, this can lead to bacterial growth and trigger ear infections.
For dogs prone to ear problems, veterinarians typically recommend that owners regularly check their dog’s ears based on their condition and clean them as needed to help maintain ear canal health. However, more frequent ear cleaning isn’t necessarily better. VCA Animal Hospitals points out that not all dogs need their ears cleaned at a fixed frequency; the need for care should be determined based on ear discharge, odor, and the dog’s individual circumstances. In this article, I’ll show you how to safely clean your dog’s ears at home and what common mistakes to avoid.
Owners who are particularly concerned about their dog’s health may check their dog’s ears from time to time and, upon noticing a small amount of earwax, decide to clean them. However, this is a common misconception—a small amount of earwax actually provides some protection for a dog’s ear canal and is a normal physiological phenomenon. This earwax helps keep the ear canal moist and blocks dust, bacteria, and other foreign objects from entering. Therefore, a dog’s ear canal isn’t necessarily better the cleaner it is.
Generally speaking, if you notice any of the following conditions in your dog, you may want to consider routine ear care:
Please note: Regular daily ear cleaning only helps remove earwax and secretions; it does not treat ear infections. If symptoms of an infection are already present, continued cleaning may actually irritate the ear canal and cause your dog more pain.
The issues mentioned above can generally be improved by using the correct ear-cleaning method. However, if your dog exhibits the following symptoms, I do not recommend continuing to clean their ears yourself. According to the American Animal Hospital Association (AAHA), redness, foul odor, discharge, and behaviors such as head shaking and ear scratching are all typical warning signs that require further observation and veterinary care:
Frequent head shaking and ear scratching—It’s normal for dogs to shake their heads occasionally, but if they suddenly start doing so very frequently, it may indicate intense itching or pain.
Red, swollen, and warm ears—The Merck Veterinary Manual notes that if a dog’s ears are red, swollen, and warm, this typically indicates a possible ear canal infection; it is recommended to consult a veterinarian first.
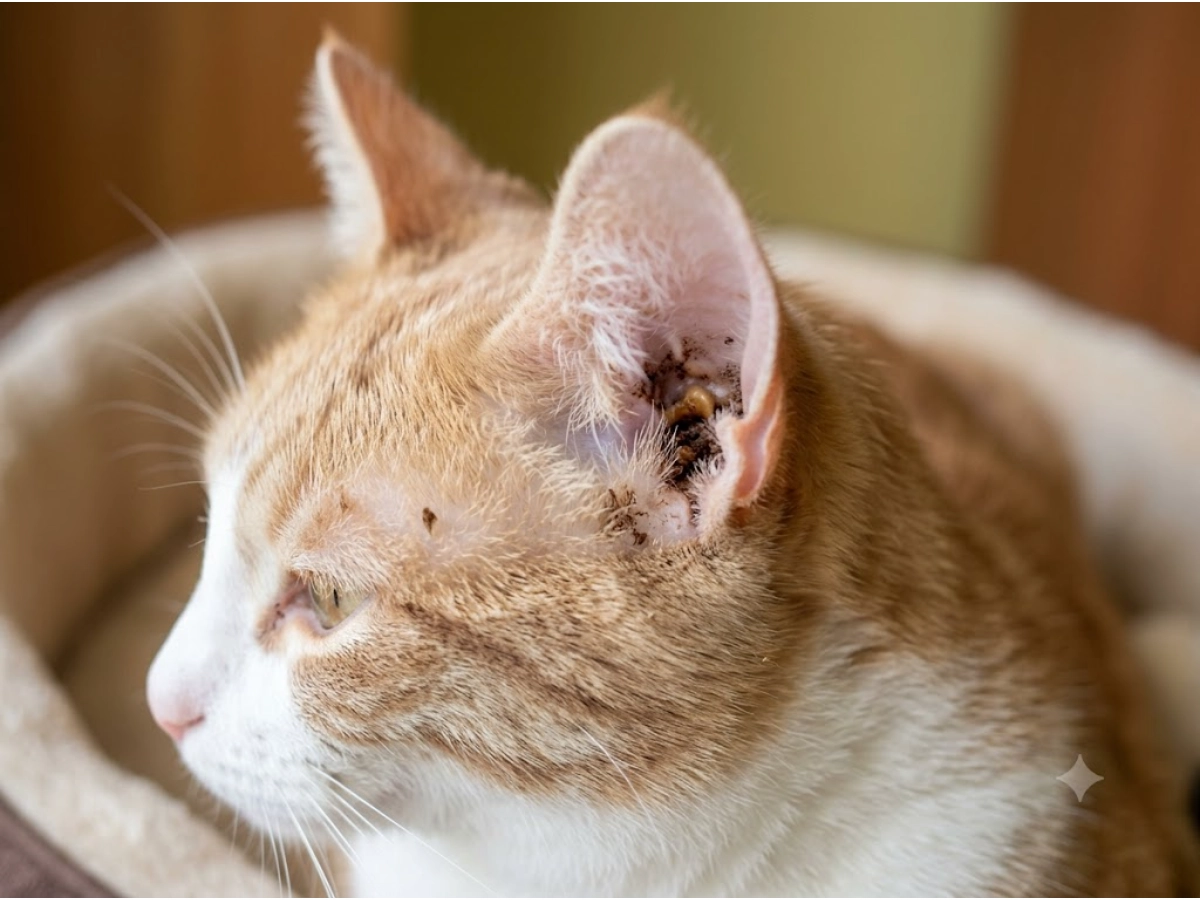
Yellowish-green ear discharge with a noticeable odor—a typical symptom of a bacterial infection. Home care cannot treat ear infections and may even worsen your dog’s discomfort
Black, coffee-ground-like earwax in the ear canal—this is usually a sign of an ear mite infestation and requires a professional veterinary examination and cleaning
Resistance to being touched, lethargy, and loss of appetite—if your dog usually allows you to touch its ears but suddenly becomes resistant, avoids contact, or even yelps, this indicates that there may already be significant inflammation or injury in the ear canal. Loss of appetite and lethargy are the most easily observable symptoms; once they appear, you should be on high alert and take your dog to the vet promptly
Not all dogs need to have their ears cleaned regularly. The ear canals of healthy dogs have a natural self-cleaning mechanism, and frequent cleaning can actually be harmful to their ears.
However, if your dog falls into one of the following categories, you’ll need to pay extra attention to ear care.
1. Dogs with floppy ears
Such as Basset Hounds, Golden Retrievers, Cocker Spaniels, and Beagles. Their floppy ears cover the ear canal, and poor air circulation traps moisture inside, creating an ideal environment for yeast and bacteria to thrive.
2. Dogs that love swimming or water activities
Because these dogs love playing in water, their ear skin often gets wet, causing moisture to accumulate in the ear canal for extended periods. If not cleaned promptly, this can easily lead to ear infections, so these dogs require more frequent ear checks and cleaning.
3. Dogs Prone to Allergies
Many cases of ear inflammation or infection in dogs are closely related to allergies. Food, cleaning products, and the environment can all be potential allergens that trigger ear problems. Therefore, you should not only clean your dog’s ears regularly but also keep them away from allergens.
There is no one-size-fits-all frequency that applies to all dogs.
Whether a dog’s ears need cleaning depends on the dog’s breed, living environment, daily habits, health status, as well as any history of allergies or illnesses. You should determine the frequency of ear cleaning based on these factors and by following your veterinarian’s advice.
However, here are some general guidelines:
| Dog Type | Recommended Frequency |
| Healthy dogs with clean ears and no ear conditions | Check once every 1–3 months; clean as needed |
| Dogs with floppy ears | Check once every 2–4 weeks; clean when dirt accumulates |
| Dogs that love water | Check after every time they play in water or take a bath; clean if moisture remains |
| Dogs prone to allergies or with a history of otitis | Follow your veterinarian’s recommendations |
To ensure that you can clean your dog’s ears smoothly, it’s essential to prepare in advance.
I usually have a checklist of essential items for cleaning my dog’s ears, which I’m sharing with you for reference:
If this is your first time cleaning your dog’s ears, I recommend calming your dog first or choosing a time and place where your dog is relaxed. The first time I cleaned my dog’s ears, I chose to do it after we returned from our evening walk. He cooperated calmly throughout the process and even seemed to really enjoy the massage.
You’ve probably searched online for ways to clean your dog’s ears, and inevitably, you’ve come across some “home remedies.” However, these methods may not be suitable for your dog, so you need to carefully assess their safety.
I strongly advise against using the following methods on your dog:
Cotton Swabs
Since a dog’s ear canal is L-shaped, using cotton swabs can easily push earwax deeper into the canal and may scratch the skin or even damage the eardrum.
Hydrogen Peroxide
Although hydrogen peroxide has some antibacterial properties, it can also be irritating. It can easily cause pain, especially if the ear canal is already inflamed or the skin is broken.
Alcohol
Alcohol is highly irritating and evaporates quickly, which can dry out the skin inside the ear canal even further and worsen inflammation.
White Vinegar and Apple Cider Vinegar
Both of these are acidic liquids that can strongly irritate a dog’s ear canal and may exacerbate discomfort.
STEP 1: Check Your Dog‘s Ears Before Applying Ear Drops
If your dog is uncooperative, have two people work together—one to calm the dog and the other to examine the ears carefully. Look for signs of redness, swelling, bleeding, infection, or obvious pain. If you notice any abnormalities, do not force a cleaning; consult a veterinarian as soon as possible.
STEP 2: Apply the Ear Cleaning Solution
Gently lift your dog’s ear flap and apply an appropriate amount of ear cleaning solution into the ear canal according to the product instructions. Before applying, you can hold the bottle in your hand to warm the solution slightly, which helps reduce discomfort during application. Be careful not to let the bottle tip touch your dog’s ear canal to avoid contaminating the tip or injuring the ear canal.
STEP 3: Massage the Base of Your Dog‘s Ear
After applying the ear cleaning solution, gently massage the base of your dog’s ear with your hand for about 30 seconds. During the massage, you’ll typically hear a faint sloshing sound—this is normal as the solution mixes with the earwax. This step helps the solution fully penetrate the earwax, making it easier for secretions adhering to the ear canal walls to loosen.
STEP 4: Encourage Your Dog to Shake Its Head Naturally
Once the massage is complete, release your hand and let your dog shake its head naturally. Shaking the head helps expel the softened earwax, ear cleaning solution, and some secretions from the ear canal. This is when the towel comes in handy—use it to wipe away the ear cleaning solution and earwax that your dog shakes out.
STEP 5: Wipe the Ear Canal Opening
Once your dog has finished shaking its head, gently wipe the entrance to the ear canal and the inside of the ear flap with a cotton ball or gauze. You only need to wipe the areas you can naturally reach with your finger. Do not use cotton swabs to go deep into the ear canal, and do not wipe repeatedly or with excessive force. If it isn’t completely clean after one try, avoid repeatedly cleaning deep inside to prevent irritating the ear canal.
STEP 6: Reward Your Dog
Based on my observations, rewarding your dog with a treat it loves and offering verbal praise after each ear cleaning session creates positive reinforcement. After a few times, your dog will noticeably resist the process less than before.
If you just want to clean dust or dirt from the surface of the ear flap, you can temporarily use a saline solution or boil some water, let it cool to a lukewarm temperature, and use a cotton ball dipped in it to gently wipe the ear flap and the entrance to the ear canal. However, these methods are relatively limited in effectiveness and cannot replace professional pet ear cleaning solutions; they should only be used as temporary emergency measures.
This happened to me once before. When I was getting ready to clean my dog’s ears, I picked up the ear-cleaning solution only to find the bottle was empty. But since he’d just finished swimming that day, I was worried that moisture would remain in his ears if I didn’t clean them. I boiled some drinking water and let it cool naturally to a temperature close to body temperature, then gently wiped the outer ear and the entrance to the ear canal with a cotton ball for a simple cleaning. Once the new pet-specific ear cleaning solution arrived, I gave my dog another thorough ear cleaning.
In my experience, this method can remove dirt from the surface of the outer ear, but it isn’t very effective against earwax that has already accumulated inside the ear canal. If your dog’s ears are healthy and show no obvious signs of earwax buildup or infection, you can use this method for a simple cleaning. However, if there is already a significant amount of earwax or discharge inside the ear canal, it’s best to wait until you’ve purchased a pet-specific ear cleaning solution before performing a thorough cleaning.
Additionally, I do not recommend using liquids such as white vinegar, alcohol, hydrogen peroxide, or soapy water to clean your dog’s ears. For ear canals that are already inflamed or have broken skin, these liquids may cause irritation, increase pain, or even worsen the existing condition.
Many first-time dog owners fall into some common pitfalls when it comes to ear cleaning. To help you better care for your dog, I’ve put together a list of these misconceptions, along with explanations of why these practices are not recommended and what the correct approach is:
| Wrong Approach | Reason | Correct Approach |
| Cleaning the ears without checking them first | There are many types of ear problems in dogs; cleaning without a checkup may worsen your dog’s discomfort | Before each cleaning, carefully inspect your dog’s ears following the steps to confirm there is only a small amount of earwax before proceeding |
| Using long-handled cotton swabs to probe deep into the ear canal | This may push earwax deeper into the ear or even damage the ear canal | Use a cotton ball or gauze to gently wipe only the entrance of the ear canal |
| Cleaning your dog’s ears too frequently | This may damage the ear canal’s natural skin barrier | Clean your dog’s ears according to their specific condition and your veterinarian’s recommended frequency |
| Using irritating liquids such as hydrogen peroxide or alcohol | These liquids can irritate your dog’s ear canal skin and worsen dryness | Use a pet-specific ear cleaning solution recommended by your veterinarian |
| Using home remedies such as white vinegar | Acidic liquids can also be irritating and are not suitable for all dogs | Use a pet-specific ear cleaning solution recommended by your veterinarian |
| Failing to dry the ears after a bath or swim | Residual moisture can lead to moisture buildup, which promotes the growth of yeast and bacteria | Dry the ears thoroughly after every bath or swim to keep them dry |
There is a wide variety of pet ear cleansers on the market, but I won’t be making any specific recommendations here. When purchasing a pet ear cleanser, you should focus on whether the product meets the following requirements:
Is the formula gentle?
Prioritize gentle, pH-balanced, alcohol-free formulas, and avoid ear cleansers containing highly irritating ingredients.
Is it suitable for daily care?
For routine cleaning, choose a product that helps soften earwax, remove dirt, and maintain a healthy ear canal environment. If your dog is already experiencing an infection, ear mites, or other symptoms, do not purchase care products on your own as a substitute for treatment; please consult a professional veterinarian.
Is it suitable for your dog’s current condition?
For dogs that swim frequently, choose products that help keep the ear canal dry; for dogs prone to earwax buildup, select ear cleansers that dissolve earwax; and for dogs with sensitive skin, gentle, low-irritation care products are more appropriate.
Is it endorsed by a veterinarian or professional organization?
With a wide variety of products on the market, it’s best to purchase those that have been tested by professional organizations or are recommended and certified by veterinarians.
1. What should I do if I don’t have pet ear cleaning solution?
You can temporarily use warm water or saline solution to clean the surface of the ear, but this is only partially effective and cannot replace professional pet ear cleaning solution.
2. Is it normal for a dog to keep shaking its head after having its ears cleaned?
It’s normal for a dog to shake its head moderately after having its ears cleaned; this helps remove dirt from the ears. However, if your dog shakes its head constantly, this may indicate an ear infection, and you should consult a veterinarian.
3. My dog’s ears are very clean—do I still need to clean them?
No. For healthy dogs, ear care should be done as needed.
4. Can I clean my dog’s ears every day?
No. Over-cleaning can actually irritate your dog’s ear canal.